Pre-production
Pre-production is the first step in the creation of a character or asset for a 3D production in the form of concept sketches.
Concept sketches are integral to the 3D production pipeline as this is the phase where concepts for the style and Style of the characters start to take shape and begin to form.
One of the key elements you need for an animation is a storyboard, which is a concept board for all of your ideas, is a “narrative” for your animation.
By narrative, I mean in terms of the animation story; what effect the animation has on the rest of the model and what the goal of the animation is. (Walking animation, idle animation, attack animation)
Preproduction is an integral part to the 3D production pipeline, and should not be skipped.

Sources:
http://www.wideopenspace.co.uk/animation-tutorial/pre-production.html
http://blog.digitaltutors.com/understanding-a-3d-production-pipeline-learning-the-basics/
3D modelling
3D modelling is the phase of actually creating your 3D model within a program such as 3Ds max, Blender, Maya ect.
It is within this phase of the production pipeline that you shift the polygons to create a character or asset.
To put it frankly, this is the phase where you are a sculptor.
https://www.youtube.com/watch?v=ZNd9ZgDkNuw
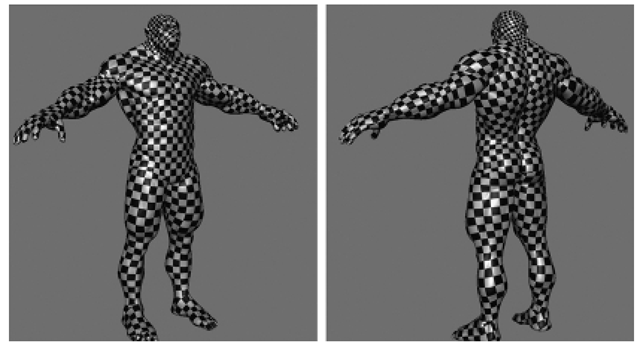
- UV Mapping
UV mapping/unwrapping is the process of marking selected edges/seams and unwrapping the mesh so the “blueprint” of the mesh can be exported into a image editor software such as Photoshop for texturing.
UVW unwrapping is often called the most tedious process of all, in part due to the excess of issues you may have with misplaced polys that you might have moved around without knowing earlier (I have had this issue multiple times).

Image source: http://what-when-how.com/wp-content/uploads/2012/06/tmpb19825_thumb.png
- Texturing and Shaders
Texturing is the process of “painting” or projecting an image to the models material.
Shaders are used to determine where the texture image is placed and what effect will be placed on the Texture, which can be determined from the different types of Shader maps there are.
There are 3 different Basic shader maps;
The Diffuse map: The default shader, which basically casts light on the 3D model in a way that showcases the textures in a more opaque way.
The Bump map: The bump map is used to determine the shine of certain areas of the texture using grey scale colours (i.e. the lighter the grey, the shinier, the darker the grey, the more opaque.)
The Normal map: Instead of a gray scale image like a bump map, a normal map is basically a map of what direction your polygons are facing.

Image source:http://www.informit.com/articles/article.aspx?p=2162089&seqNum=2
https://developer.valvesoftware.com/wiki/Bump_map
http://gamedevelopment.tutsplus.com/articles/go-beyond-retro-pixel-art-with-flat-shaded-3d-in-unity–gamedev-12259
http://wiki.blender.org/index.php/Doc:2.4/Manual/Textures/Influence/Material/Bump_and_Normal
http://blog.digitaltutors.com/understanding-difference-texture-maps/
- Rigging
Rigging in the 3D production pipeline is the phase where you “rig” a character with “bones” and assign the character bone weights and bone groups.
Similar to a real life skeleton, a rig is made up of joints and bones, each of which are used by the animators to bend the character into the desired pose and animate.
Rigging is typically done by a “Rigger” or the animator themselves.
While the main body rig is generally basic, facial rigs are much more complex to rig, thus the face rig is typically separate from the body rig.

https://apbloganimator.wordpress.com/wp-content/uploads/2015/03/da2e2-musclerig.jpg
- Animation.
The lifeblood of animation is, of course, the animation.
Basic animation involves the use of “key frames” to complete the animation.
Keyframe animation is the use of time increments to determine what actions have lead your character to do whatever they are doing.
Here, using the rig you built before-hand, animate your character to complete a specific action to complete.
Often the animation will reflect what type of character you have; a twitchy paranoid character will move as such while a more calm, cool and collected character will move more freely.

http://vfs.edu/images/programs/digital_character_animation/wywl_caroline_jarvis.jpg
- Lighting
Lighting within the world is very passive, but within the 3d modelling industry, lighting is everything.
Lighting within a scene is paramount, as it can be one of the determining factors that can make or break a renderer.
There are a fair few different types of light within the 3D modelling program:
Point Light: A small directional light that casts light outward in every direction from a single, small point in 3D space.
Directional Light: A directional light is meant to have the effect of an extremely distant light source, like sunlight.
Ambient Light: ambient light is a soft light that is cast out in every direction from the source
Ambient light is mainly used for darkly lit rooms and other darker areas where a significant amount of light will drastically effect the scene.
- Rendering
Rendering is the end product of the production pipeline in which the 3D model and animation will be fully complete and detailed.
The time of rendering a scene will completely depend on what resources you have, how much detail is within the scene and how many polys are present within the scene.
Fully rendered scenes are typically what is shown in the final product of your 3d model.
- Compositing
Compositing within 3D modelling and animation is typically refered to as CGI, as it is computer generated effects composed over the top of a live action scene.
There are many different studios that specialise in this area, such as WETA based out of wellington, New Zealand.


